Introduction

My name is Thakshana Yogeswaran and I am a media student at The Latymer School. My candidate number is 9179.

I am working in Group 3 with Gift Emesi (9044), Angela Chen (9025) and Monica Aghadiuno (9365)

In order to view my work please click on the 3 labels on the right named A2 Research and Planning, A2 Construction and A2 evaluation.

Group 3 - Music Video

Inside Panels

Inside Panels
Our Digipack, top left - back, top right - front, bottom left - inside panel, bottom right - inside panel (CD)
This is a link to our website, click the image above to enter our site

Monday, 21 December 2015

Construction Post 2: Days 4-6 of Music Video Shoot

Our main aims for days 4-6:
  • Film my individual shots with the scaffolding backdrop
  • Film all of our shots with our guys
  • Film the dinner table scenes
  • Review all our footage and make decisions on whether or not we need any re-shoots
  • Film any retakes of any shot that we didn't like
Day 4 - Thursday 26th November 2015

Our main objective for today's shoot was to get all the footage with our individual guys and we managed to get all the footage with the guys for Monica, Gift and Angela. However, the actor that was supposed to be my 'love interest' couldn't come due to unavoidable circumstances. We therefore had to come together as a group and make some changes to our shoot schedule. Now that we had a bit of extra time on today's shoot, we decided to film some experimental shots.


Previously, we encountered a problem with our black background with white strobes set up so we thought as a solution we would opt for a lighter background so that you can see our faces but still keep the white strobes. To your left is one of the takes we took with annotations.


In one of our previous filming days, we shot Angela's individual scene in two different ways; one with the spotlight directly on her and the lasers behind her and one with the spotlight pointed slightly away from her so that her face is still lit but the lasers are also more prominent.

We also filmed her scene with her guy in those two different ways so that we could ask for people's opinion on which one looked better because we weren't sure. We showed a couple of people two different versions of the footage of Angela and Mario and wrote down their feedback.


Upon hearing feedback from a variety of different people, including our media technician, Emma, we came to the conclusion that the one where the spotlight isn't directly on them looks a lot better. Some things that people said were:
"The second option looks a lot better because there are no shadows behind them." 
"The lasers are a lot clearer in the second one so the effect from them is stronger"
"In the first one, the lasers blend into the background and I didn't really notice them at all"


Day 5 - Friday 27th November 2015

The main focus for this day was to film all my individual shots in front of the scaffolding and also get all our group shots done as well. This was also the day where we had time to reshoot shots that we didn't all 100% like or shots that didn't turn out the way we envisioned.

We started with our group shots in front of the scaffolding:


On the left is a picture of us setting up the scaffolding without lighting and on the right is the whole setup done including lighting.


The shoot today went really smoothly and we got all the shots that we wanted and we also had a chance to reshoot some stuff that we didn't really like. This was our last full day of shooting so at the end of it we also had a brief group meeting with the schedule and discussed the schedule for Saturday. Since my shots with Aaron hadn't been filmed yet, it meant that we had to adjust the original schedule meaning that we had an earlier call time, which we were all fine with.

Day 6 - Saturday 28th November 2015

This was our final day of shooting! The prospect of it being the final day was both exciting and really nerve-wrecking
Here is a part of our shoot schedule for the final day of shooting. 


We started off the day by filming my shots with Aaron. At first we were really struggling to get into it because my verse in the song is quite long so we had to find things to do to fill out that time but not make it boring or draggy at the same time.

It was also hard to light this scene because I started off on the ladder and then walked down and me and him were also walking around the set.

I have shown an example of one of the first takes which isn't very good and is also lit very badly:


Initially, we were confused about how to light it but in the end we figured it out and had two floor lights on either side fully flooded to light the whole set. Even though there was a bit of a struggle at the beginning, we all managed to come together as a group to figure stuff out for Aaron and I to do and in the end I think our shots turned out pretty well.
I have included one of the good takes below:


The last and final scene we had to film was the dinner table scene. This scene was pretty easy to film but if we had the chance to do it again I would add some plates and cutlery to the table to make it look less empty and more realistic. Some of the guys also forgot to bring a white shirt so half of them were wearing black whereas the other half were wearing white so that looked a bit odd. This was an error on our parts because we should've reminded our actors the night before.

We also tried to take some artsy shots as shown below:

The focus on the wine in the glass is really sharp and although Monica's arm is in it the focus is drawn fully to the wine.


Construction Post 1: Days 1-3 of Music Video Shoot

As our group had a variety of different backdrops and 6 days to shoot the whole video, we decided to split up each shooting day based on the set-ups that we could use for that day. Here are our list of backdrops:

Our Main Priorities for Days 1-3:
  • Get all of our beauty shots done (in front of white backdrop)
  • Film Monica, Gift and Angela in front of their individual backdrops
  • Get all our filler shots eg. popping balloon etc
  • Film our chorus dance shot in front of the white, black,red and panelled backgrounds
  • Review footage after every shoot day and identify anything that needs to be re-filmed and allocate time for that in our schedule.

Day 1 - Monday 23rd November 2015

Extract from Monday's shoot schedule
Picture of Gift and I positioning the lights
Our call time for this shoot day was 7am, we all managed to arrive on time, however, we still didn't manage to start shooting on time as we underestimated how much time setting up the lights was going to take. Even though we had pre-set our lighting colour and intensity at the lighting desk, the positioning of the lights had been moved so we had to move them all back to how we wanted them, which took an incredibly long time and since we didn't schedule for it, we ended up starting filming an hour later than planned.


However, once we got started, we picked up the pace and managed to make up for lost time. We planned to film set-ups 1,2,4 and 9 today. We successfully managed to film in 1,2 and 9 with no major problems. Once we reached set up 4, however, there was a slight problem. In order to achieve a black background, we had to have a complete blackout in the studio but this meant that it was so difficult to actually see our faces even with the flashing white strobes.


When we were experimenting with the strobes and figuring out ways to make this set up work, I suggested that we try the strobes on an individual person with the black background. We decided on Monica because her verse is a rap verse and the jumpy effect that the strobes created on the black background worked really well with this part of the song, as shown in the video on the left.


We also filmed the individual spotlight shots and they came out pretty awesome. When we were reviewing our footage, this was one of the shots that we all really liked and it matches up well to what we intended it to look like.


Day 2 - Tuesday 24th November 2015


Most of the shots that we planned to film were using the panel backdrop. We wanted light to shine through the backdrop making it look illuminated so we set up two floor lights behind the panel and added a red/orange filter on it.

Me filming Monica and Gift performing


We initially wanted our group dance to be all four of us standing in front of it dancing. However, due to the limitations of space we made the decision to dance as twos and then try and intercut them when we edited the footage.


Upon reviewing our footage after Tuesday's shoot, we realised we had quite a few shots that we wanted to redo, some due to focusing issues with the camera and others due to wrong lighting and wrong framing. We revisited the shoot schedule and put stars next to the shots we wanted to redo.


Day 3 - Wednesday 25th November 2015

The focus for today's shoot was to film all of Angela's shot's in front of the black background with the lasers and one white spotlight and once we got that done, to film some of our filler shots such as the balloon popping one. This was a short shoot day, so we only had time to film a couple of shots, as we had to leave the studio by 5:15pm due to the studio being unavailable after this time.

 However, we faced quite a major problem with Angela's shots. As you can see in the images to the left, the spotlight makes the laser lights harder to see and the impact of the lasers are reduced. We therefore had to figure out a way to make the lasers more prominent whilst also being able to see her face. There are also massive shadows on the ones to the left which we didn't like. We therefore decided to point the spotlight not straight at the people but slightly to the side. By doing this, we eliminated the shadows, made the lasers more prominent but at the same time we can still see their faces as demonstrated by the picture on the right.


R+P Post 33: Reflections on my Role and Contribution During Research and Planning

My individual contributions:

  • I did the research into what similar girlbands wear and how they do their make up and then helped to make decisions about our own costumes, hair and make up.
  • I helped with actually coming up with the make up looks and trying them out
  • I made the flatplan for our website and in order to do this I had to thoroughly research other websites and draw inspiration from them but also make sure I don't miss out any important conventions. 
  • I helped make the set backdrops
  • I filmed most of Gift's individual shots, both static and moving, which meant I got a feel of how to work the camera properly and also learnt about how to manually focus a camera. When we watched the shots back, some of the ones I filmed were however still out of focus so this is something I need to work on leading up to the main shoot.
  • I also helped set up the lighting for the spotlight shot and also other shots so that when it comes to our main shoot, everything is already ready and we know exactly what we want in terms of lighting. 
[ADD PICTURES]

R+P Post 32: Test Shoot and Rough Edit

Here is a picture of our test shoot schedule. My groups sessions are colour coded in yellow. We didn't have much time so we had to be selective about everything we wanted to test. On Tuesday, Gift and I planned to test out our individual shots, then on Friday, Monica and Angela will film their individual shots and we will also film all of our group shots. We have allocated the Saturday to shoot with the guys as it was the best time when everyone could be there.


Rough Edit:


What we learnt from the test shoot:

Be a lot more prepared - Although we did try and organise things smoothly, things were really chaotic during our test shoot week, especially on Saturday. We were filming with the guys and although we had a vague idea of what we were doing, we weren't confident enough or ready to direct the guys as well, this is something that we have to work on before our real shoot.

Keeping to the schedule is vital - This is also another important lesson that we have learnt from the test shoot. During the week, even though we had some sort of a schedule, we didn't really stick to it at all meaning we couldn't get every single shot that we wanted to and Friday evening and Saturday morning was really manic as we tried to get every shot that we intended to. For the main shoot we have all agreed that we will stick rigidly to the schedule.

Make sure the camera is focused - This is an issue we faced throughout the whole week where we weren't checking if the shots were properly focused and then when it came to the edit and we were reviewing the footage, some of them were out of focus and unusable.
We need someone to film our group shots for us - With all four of us being in the video for the group shots, we had to get one of our fellow classmates, Amber Mota, to help us with filming the group shots that weren't static. I have included an example of our group dance shots below. We filmed everything else where all four of us weren't in the same shot.


Communicate better with the actors - Due to unforeseen circumstances, one of our male actors, Aaron, couldn't make the shoot on Saturday. Although we could manage without him for the test shoot we had to talk to him about whether or not he was 100% sure he could make the main shoot. We had to stress to him how important this was and he was very apologetic and said he would be there for the main shoot for sure.

We feel that the test shoot was really beneficial for this project as it helped us discover any problems we had and gave us time to fix these problems before the main shoot. This means that we will not be unprepared for our main shoot and we can ensure that we have corrected everything that we weren't happy with in the test shoot to create a music video that we will all be proud of. 


R+P Post 31: My Call Sheet

A call sheet is a schedule which is handed to everyone, cast and crew, who are working on the project and it includes important information like contact details and call times of each individual member so that everyone knows exactly what's going on and when are where they are needed. This helps avoid confusion over timings and where people need to be.

Here is an extract from our call sheet that we have produced for the first day of shooting:


Important aspects include:

  • Timings - when and where everyone needs to be
  • Breaks/Lunches
  • Crew, Cast and Tech call times
  • Allows time for hair and make up
  • Shows where we have to change set ups to adjusting lighting etc.

Benefits after shooting:
  • Everyone knew exactly when they were needed so our actors and crew were all as efficient and on time as possible 
  • There was no confusion about when, what and where we were shooting
  • It made the shoot days a lot easier to deal with as everyone was organised, this was something that caused us a problem during our test shoots. 
  • It helped us as well because it's essentially a condensed version of the shootboard so it was easy during the shoot to quickly check what's supposed to be happening at what times.

R+P Post 30: My Shootboard

A shootboard is a multi-functional document which provides a shot list, a set-ups list and a shooting schedule all in one document. It's extremely useful during shoot days as it contains all the necessary information required for a shoot to run successfully. We created six different shootboards, as we have six individual days of filming. It was really time-consuming to make but we feel it will be a very vital and helpful document.

Below is an extract from one of the shootboards:


I have also annotated an extract of the shootboard which showcases all the important factors that a shootboard contains:

Why the shootboard was useful: 
  • It contained timings that we tried to follow strictly which meant our shoots could run smoothly and everyone knew what to be doing
  • It contained important info about camera movement and framing so it made it really easy for the person filming, they just had to follow the directions on the shootboard. 
  • It was also useful in the sense that we knew where everyone was at certain times, eg. when the others left for lessons
  • The pictures and the descriptions of the shots were really detailed meaning it was also easy for us to act in it, because everything that was needed was written on their.
  • It also helped us avoid confusion as to what set-up/costumes we had to be in for each shot because again it was all written on their really clearly


R+P Post 29: Rehearsals

As a group we have allocated one intense week of training for us where we will be rehearsing in both the studio and any other places we can (ie. media block)

The picture on the right shows the rehearsal schedule for the studio, the yellow boxes are the times where the studio was specifically allocated for us to rehearse in and test out things like lighting as well.


Before our rehearsal week we made a list of all the things that we felt needed to be rehearsed:

  • Dance routine will be our main priority, we need to get this on lockdown and make sure everyone in the group is confident and knows the routine well.
  • Our individual parts and figure out what we're going to do facially and also with our movements for the individual parts of the song
  • Rehearse with the guys and give them a run down of what we need from them and it'll be good for them to rehearse it too
  • Try out some lighting set ups and save them to the memory on the monitor so that when we're actually shooting setting up will be a lot easier
  • Rehearse lip-syncing properly to the song

The week before our main rehearsal week we watched a few YouTube videos where they dance to certain songs to get inspiration for our dance moves. We also contacted Jasmine, who was also our performance coach during our preliminary task, to help us come up with  a dance routine for the chorus of our song, since none of us were professional dancers. 


This is one of the videos we watched and we also filmed Jasmine's routine and then we tried to come up with a routine ourselves which incorporated all aspects in it.  (ADD JASMINES ROUTINE) 


Here is a video of one of our first ever rehearsals in the studio. As you can tell, it wasn't very good and we realised that this isn't going to be as easy as we initially thought. It was hard to keep in time with everyone and also look good whilst dancing. This was a huge deal and we realised just how much work had to be done.


Here is a video from a few days later in the rehearsal week. It's a little snippet of Gift and I performing part of the chorus. Again, it's not very polished or perfect yet but we could tell that we were improving and that was making us very happy. (ADD VIDEO)


Here we were testing out lighting for both the red silhouette shot and also the red and white spotlight shot. 


This is a picture of one of our rehearsal sessions with the guys where we were practising poses and also posture.
Organising a rehearsal week was really beneficial for us because we all practised so hard and compared to the beginning of the rehearsal week, we have come a long way with our dance routine. It also helped in terms of practising with the equipment and lighting as well. We learnt how to properly work the camera and also how to properly operate the lighting desk to get our desired lighting and save it as a memory.

R+P Post 28: My Kit List


Our whole shoot will be filmed in the studio since we want to make this video performance based. We, therefore, have no location shoots which makes things a little simpler as we don't have to worry about carrying kit from one place to another and can just continually film in the studio. To your right is a picture of the studio without the cyclorama out.
Our technical kit list was:
- Canon 5D Mark II camera
- 50mm Canon Lens 
- 24mm - 105mm Canon Lens   
- Floor Lamps
- Turrent Lamps   
- Tripod
- Dolly
- Cyclorama
- Spare Batteries
- 2 SD cards
- Lighting Rig
- Lighting Desk
- TV Screen
Lectern with: 
- Mac Book Pro
- Tablet which controls certain features
- Studio Sound System

Kit and Intentions:


This is the camera (Canon 5D Mark II) we used throughout the whole shoot. It had very high resolution filming capabilities and the lenses could be changed to adapt whichever type of shot we were trying to film.


This is the 50mm lens on the Canon 5D Mark II camera. This lens allowed us to take really crisp shots even when the aperture was really high and  have more depth of field. 

This is the 24-105mm lens on the Canon 5D Mark II Camera. This lens allowed us to zoom really far into the shot and is useful for shooting from afar and getting extreme close up shots if needed. 

These are the floor lights that we will be using. You can put coloured filter papers on top of them to get a different coloured light to the normal white light. They have barn doors so you adjust how much light comes through, dials to control the intensity and also knobs which controls how flooded or spotted the light is. 


This is the turret light that we will use to create the spotlights for our individual spotlight shots. Our technician advised us that this was the best light to use for the spotlights as you can again adjust the intensity, the colour and how flooded or spotted the spotlight is. It also creates a light which forms as a perfect circle.  


In the bottom right corner of the picture to your right you can see the tripod that we used. It helped with all the static shots as if we tried to do it handheld it would have been quite shaky. For the moving shots where we track and pan we used a dolly, which is essentially putting the tripod on wheels. This allowed us to track our shots really smoothly and effectively. Behind Gift is the cyclorama that we will be using. It allows us to have a white backdrop to shine the lights onto to create a professional studio look as well. 

This is the lighting rig which has lights all the way around the studio meaning you can light it from all different angles and all different colours and intensities depending on how you would like it. You can also use the sticks to move the lights either up or down, left or right and you can also make them more spotted or more flooded. 

To the left is the lighting desk and to the right is the monitor which controls all the lights on the lighting rig and also the house lights. If we want to adjust any of the lights, we have to do it from here.


This is the TV which we can plug into the camera using a HDMI cable to view whatever's on the camera on the TV in a magnified version which allows us to see the lighting of the shots and framing more easily. It also means when we have no one else to film for us we can film ourselves using the TV as guidance to make sure we are dancing/performing in the shot. 


This is a picture of the lectern where there is a MacBook, tablet which controls certain features in the studio like houselights, blinds, windows etc. It also controls the sound system of the studio and you can adjust the volume using it. We used the MacBook to play the audio. 

R+P Post 27: Casting

As a group we decided that all four of us will be the band members because:

  • We all have been taught and have experience in how to lip sync properly 
  • We have all been given performance coaching
  • We know our vision better than anyone else so it's easier to direct ourselves
  • This project will be our priority so we know for certain that we will all be committed and turn up on time and carry out this project properly and with dedication
  • We're all really enthusiastic about performing and even though none of us have done any professional dancing before, we're confident that if we work hard and rehearse well, we'll be able to pull it off
Band Members:

Angela - 17 (Character Name: Angel) 


                      Gift - 17 (Character Name: GiGi)


Thakshana - 18
(Character Name: Shaana) 


                                     Monica -17
                                     (Character Name: Monigal)
                                 

We also needed to cast four guys to be in our music video. Since our main theme is passion and female empowerment we thought that we could all use one guy each for our individual performance section to portray passion and use them as 'props'. Seeing as they were mainly just going to be standing there as props we decided that they didn't need to have much experience, so the main priority was availability and commitment. 

We asked a few guys that we knew and initially some people said they weren't available so we proceeded to ask other people and eventually managed to get four actors for our music video.

Below is our final cast list for the guys:


R+P Post 26: Set Designs, Locations and Props

The entirety of our music video will be shot in the studio as our whole video is more performance based and our ideas didn't the require of any other location shoot.

However, we did have to create certain backdrops and put together certain things to create our desired background/setting.

Proposed Set Designs that we actually had to create/put together
  1. Panel backdrop
  2. Scaffolding
  3. Grafitti 'D4MES' backdrop 
1. Panel Backdrop

We wanted to create something similar to this but with more rectangles dividing the big rectangle. We also don't want to use this for a silhouette shot but rather for someone to dance in front of. Below is a clearer picture of what we want to do. 

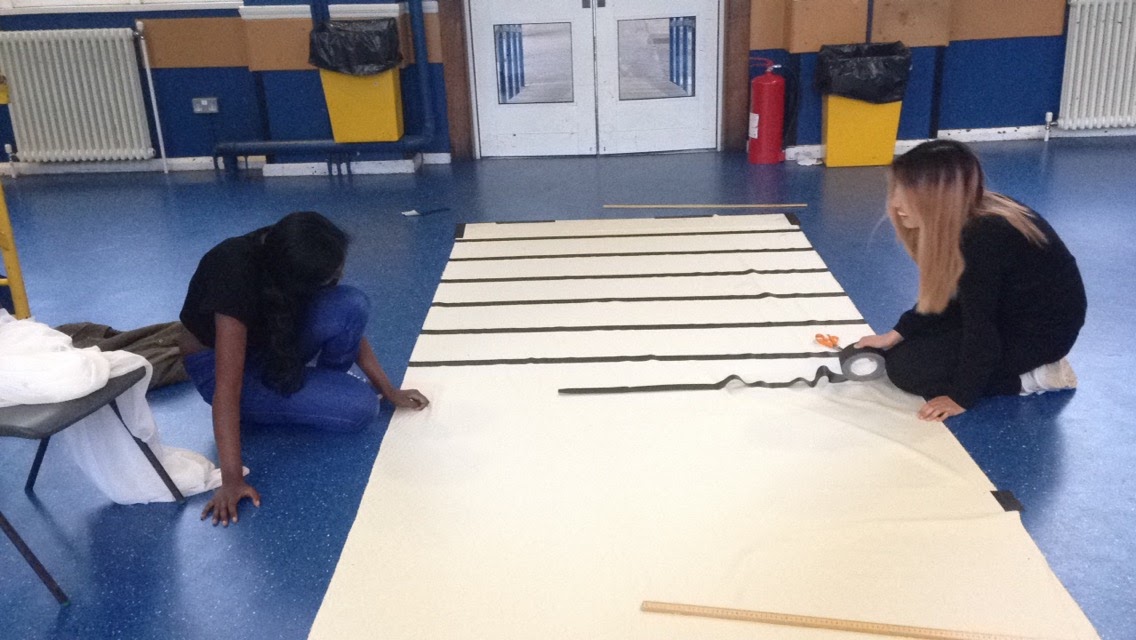
In order to create this, we initially came up with using thin cardboard/paper and then using something like a metal pole to hold it up. However, we soon realised that cardboard will not shine light through like we want it to. We therefore had to rethink our ideas. We spoke to a couple of our teachers and together came to the conclusion that we should use cloth instead with black gaffa tape to create the lines and then prop it up using metal poles. 


Above our pictures of us making the actual backdrop. This was a long and tedious process and required us to measure out the cloth and then measure out were the tape would go. We also needed a large area to do this as the cloth was pretty big so we had to use the common room in our school. However, we worked together as a group to get it done and we were pleased with the final outcome. 


2. Scaffolding/Industrial Look

Since our band's identity was street and urban we decided that we want a setup where we could create an industrial feel with scaffolding. A group in one of the previous years did it and we really liked the look and feel of it so we asked out teacher about it who said it was possible but we had to email Mr Armani, the school caretaker, to actually ask his permission to use it and bring it up to the studio for us. He kindly agreed to do this for us. 
3. Graffiti D4MES backdrop

In order to make our industrial set up more effective we decided we wanted to add a graffiti version of our band's name up there. Initially, we thought this would be quite easy and not time consuming but we underestimated this. We first had to create a stencil to use for the spray paint. This proved quite difficult as we had to figure out which bits to cut out and which bits to keep to create the correct stenciWe were not allowed to use spray paint inside the actual school building so we had to do it outside and also wear masks for safety reasons. We then had to leave this to dry overnight and then come in the next day to go over the outlines with black paint. 

Here are some pictures of us creating the stencil. 


Here are some pictures of us actually spray painting and then painting the black outlines.